Setting up a particular printer as the default printer was a very easy task in Windows 7. But if you want to do it in Windows 10, it would be a bit difficult. Here on this page, we’ll give you a step-by-step guide on how to set up a default printer for Windows 10.
Sometimes we need to use multiple printers on a computer. We want to set a particular printer as the default printer. The default printer will be come up as the selected printer when you give print command. Sometimes, we need to change the default printer to another one as well. Please follow the following steps.
1. Setting up default printer in Windows 11/10 using control panel
You can pick your default printer is to use the Windows Control Panel. Open this, then choose “Devices and Printers” from the list of icons. You’ll see a new bunch of icons, which represent the hardware you have available. Look down a little to find the Printers section, then find the one that you want to set as the default. Right-click on this and read the menu that comes up. About halfway down there’s a line which says “Set as the default printer,” and you need to select that. If a confirmation box appears, press OK. Your new default printer is now set!
- Click the Start button.
- Click on the Control Panel (Gear Icon).
- Click on Devices
- Click on Printer & Scanners
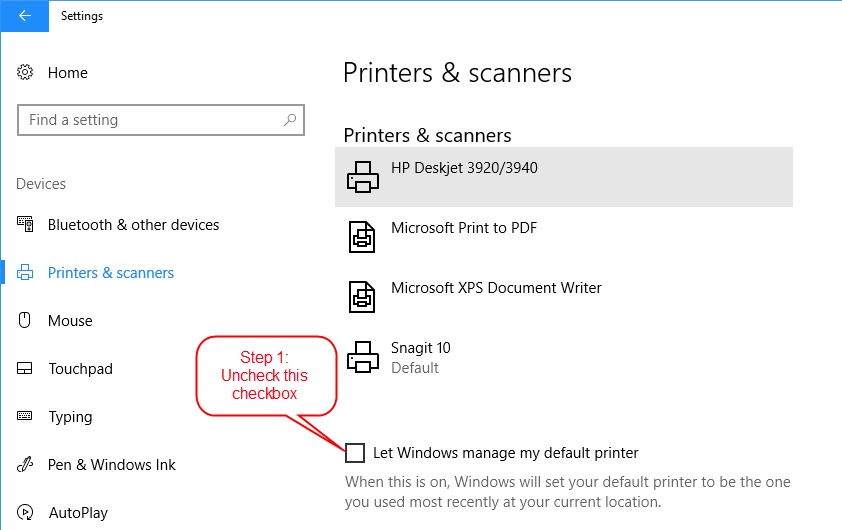
- Do un-check the checkbox “Let Windows manage my default printer.”
- Click on the Printer you want to make as default
- Click on Manage
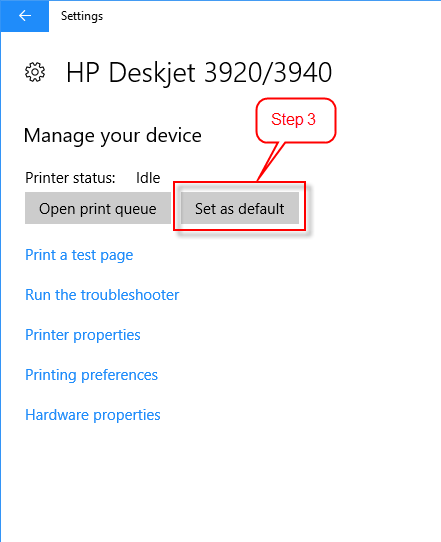
- Click on “Set as default.”
If the steps doesn’t work for you then go to the Microsoft official Instruction
Screenshots:


Check out this video tutorial to properly know how to set your printer as a default printer.
Most people who use Microsoft’s Windows 10 operating system will need to do at least a bit of printing. In older versions of Windows, setting up a printer could be awkward, but happily, this is no longer the case. The first thing you’ll need to do is to make sure that your printer is properly connected and switched on, so check all the necessary cables as well as sockets. If your printer uses wireless rather than a USB connection, check that as well.
There are four main ways to set default printer settings in Windows 10, and they all work well so select the one you find most comfortable to use.
2. Set up default printer using default settings
This one is pretty easy. First, go to Settings, and then select the icon marked Devices. On the left, you’ll see “Printers & scanners,” so click that. At the bottom right, there’s a checkbox called “Let Windows manage my default printer” – you’ll need to UNCHECK this box. Then, look in the “Printers & Scanners” section, which will list all the options you have for printing. Select the printer you want to use, then confirm by clicking on the “Set as default” button. That’s it – you’re done!
3. Set default printer through Command Prompt
This option works best if you like to have precise control over your hardware settings. Open the Command Prompt, and then type in “wmic printer get name,default” (without the quotes) and press Enter. Here is a list of all the printers that can be used with your PC. Look at the extreme left of each row and you’ll see either TRUE or FALSE – the one marked TRUE is your current printer. Find the one you want to set as default and note down its name. Then type “wmic printer where name=”blahblahblah” call setdefaultprinter” (using the printer name instead of “blahblahblah”) and your new printer will be set.
Letting Windows manage printers automatically
Open up Settings, then go to Devices. Click “Printers & Scanners” on the right, and you’ll get to the same screen that was mentioned in the “Using the Settings menu” section. Find the checkbox for “Let Windows manage my default printer” and CHECK it. It is the quickest way to set default printer in Windows 10, but it only works if you want your default printer to be the last one you used in your current location.
