Hello! The ntldr file is an essential component of the Windows XP boot sector and startup. Therefore, the system will not boot if this file is missing or corrupted. Indeed, NTLDR is the abbreviation of NT loader. It is the bootloader for all operating systems of the Windows NT family. Therefore, it is a loader that contains the list of other files that must be loaded first. Although it is a small file, its lack can be catastrophic. It renders the system unbootable. But don’t worry, today we will see how to solve this problem.
Fix “Ntldr is missing Press Ctrl+Alt+Del to restart” Error
There are 6 possible ways to fix ntldr missing problem. Please apply one by one on your computer.
Solution 1: Restart the computer
Do not restart it, but turn it off completely. Next, locate the power cord and verify that it is properly connected. Please wait 10 seconds and turn it back on. This may work as the problem may be caused by an incorrect shutdown or a hibernation conflict.
Solution 2: Check the computer’s drives
Verify that the CD or DVD is not inserted in the respective drive. Also check that a USB flash drive is not inserted in the USB port. This error is related to the boot order of the system. Then try running the system again.
Solution 3: Check the startup sequence
BIOS determines on which drive Windows should be loaded to boot when the PC is turned on. It also sets the order in which this should be done. For example, the operating system can be searched for on the hard disk, then on a CD, USB, etc. This is the boot sequence. Therefore, a ntldr error will be generated if there is no Windows in the predefined boot drive. Consequently, configure the boot sequence so that the first drive is the disk where Windows is installed. Alright, you can try temporarily booting the device from the hard disk to see if the problem is resolved. If so, we need to confirm these changes from BIOS. To find out how to access this section, please check our tutorial.
Solution 4: Set BIOS defaults
Occasionally, the wrong BIOS setting caused the hard disk not to be detected. As a result, a boot failure occurs. Therefore, the solution is to set BIOS defaults. With this in mind, enter the BIOS settings. Next, select the option to restore the bios to default values. If you don’t get it, it is most likely in the Exit section. Once you’re there, you should see something like Load Setup Defaults or Load Fail-Safe Defaults. Next, save the changes, exit the BIOS and restart the computer.
Solution 5: Reset the Windows boot files.
If none of the above solutions work, then it is necessary to restore the ntldr and ntdetect.com files. To do this you need to have a Windows installation media. Either CD/DVD or USB. See our guide on how to prepare it. Next, you must boot from the USB to launch the Windows XP installation. Then, follow the steps below: First, press any key to boot from the removable media.

Next, you must let the installation program run. Please do not press any key.

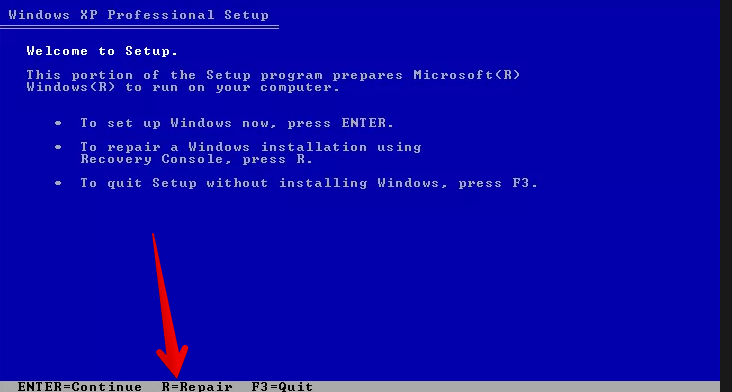
Next you will see the welcome screen of the Windows XP installation. Please press the letter R to go to the repair console.

Next, you must select the Windows installation. Finally, press R to start the repair process.

Then you must enter the administrator password. When the command prompt is displayed, you must enter the following commands:
copy D:\i386\ntldr C:\
copy D:\i386\ntdetect.com C:\
These commands copy the files from the installation media (D:) to the Windows installation disk (C:). Of course, these values may vary according to the particular case. So, you must enter the values corresponding to your Windows installation. If you are prompted to overwrite either of the two files, press Y. Next, extract the Windows installation media, type Exit and press Enter to reboot the system.
Solution 6: Repair boot.ini file
Sometimes a misconfigured boot.ini file can generate this error. Consequently, it is necessary to repair it. It is a procedure similar to the previous one, since it also involves a Windows XP installation media. Therefore, you must follow the same steps as above until you get to the recovery console. From that moment on, follow the following steps one by one:
- First you must select the Windows installation to be repaired. Please type 1.
- If you are using an administrator password, please type it. If not, then press Enter.
- Then run the following command:
bootcfg /rebuild
The function of this command is to scan the computer for installed Windows systems.
- After a while, the wizard will detect the Windows installation. Most probably, it will be located in the following directory: C:\Windows. You must press y and to add the installation to the boot list.
- Next you must enter the name of the operating system:
Windows XP
- Next, enter the following command:
/fastdetect
- Finally, type Exit to exit the repair console. Press Enter, remove the installation media and reboot the system as usual. The following image details all the commands you need to use.

If none of these solutions work, then it is most likely a hard disk error. In this case, please check the physical connection of the hard drive. However, most of the time this error can be corrected with the solutions provided. See you soon!