While playing games on your computer if you are experiencing choppiness, delays and lags, then you are experiencing game stuttering (). As the computer games are getting more demanding on the hardware this problem of game stuttering is getting more common for gamers. Although game stuttering can happen in gaming consoles as well, but with computer gaming you have the option to resolve this issue by altering some settings. Therefore, in this guide, you will learn how to fix computer stuttering problem in Windows 10 without upgrading your hardware.

In a computer, the game stuttering is caused when there are delays or lags between the graphics processing unit (GPU) and the image being displayed on the screen. This lag may be there during the normal computer operations as well, but it’s most noticeable during the gaming as the impact is easily visible. Since the game feels slow and skips frames the users are late in their reactions and their gameplay is completely disrupted.
Computer stuttering happens due to hardware or software problems, or even both. In hardware, this problem can be caused due to slow GPU, Low RAM, overheating processor (GPU/CPU) or slow CPU. To solve these issues you will have to upgrade your hardware, which can be a costly affair. As for software issues, they can be caused due to faulty or outdated drivers, improper software installation, etc. The most important thing to remember is that stuttering is rarely caused due to one reason. Therefore, you must determine the root cause of this problem.
For all the reputed games you can easily find their benchmark results. These results will give you an insight of the performance of that game on various GPU, CPU and RAM configurations. Go through these results to determine whether your computer is capable of running that game or not. Most importantly, you should configure the game settings which are best suited for your hardware configuration.
How to Fix Computer Stuttering Problem?
The first solution that comes to mind for solving computer stuttering issue is a hardware upgrade. However, this solution is not feasible for 99% of the users. Don’t worry, there are ways to bypass these issues by altering some settings on your computer. You may have to compromise on the overall quality of the game display, but you will be able to play your favorite games without any lags, delays or stuttering.
1) Make sure the Windows Game Bar is set to Off Mode
Over the years, Windows 10 has added several features which actually increase the chances of game stuttering. Latest updates have worsened this problem rather than solving it. The tasks that Windows run in the background slows down your computer’s performance, but you have the option to turn off these settings and speed up your computer.
You must turn off the Windows game bar’s record settings if you want to reduce stuttering on your computer. Follow the steps given below to turn off these settings.
- Click on ‘Start’ button and select ‘Settings’ option.

- In the Settings page, click on the ‘Gaming’ option.

- In the Gaming section, you will find ‘Game bar’ on the top of the list. Under ‘Record game clips, screenshots and broadcast using Game bar’ option use the slider to turn it ‘Off’.

- Similarly, go to ‘Game DVR’ option below and turn off ‘Record In The Background While I’m Playing A Game’ settings.
- Reboot your computer.
This solution will surely work for those users who started experiencing stuttering after some Windows update. Sometimes you have to perform these steps multiple times for them to stay permanent. That’s because Windows will turn these settings ‘On’ after each update. As a precaution you can try disabling automatic Windows update so that you can manually control these settings.
If this solution doesn’t work for you, then try the next one.
2) Make sure the processor maximum state is set to 99%
The Intel Turbo Boost feature of your computer overclocks your processor, which may lead to overheating while playing game and eventually cause stuttering. Therefore, when you disable Intel Turbo Boost you make sure that your processor can run in optimal speed for long hours without getting overheated. This will surely reduce the chances of computer stuttering.
Follow the steps given below to turn off Intel Turbo Boost on your computer:
- Press ‘Win + r’ keys simultaneously to open run dialog box. In this box, type ‘powercfg.cpl’ and click on ‘OK’ button.

- Click on the ‘Change plan settings’ in front of your active plan.

- Click on the ‘Change advanced power settings’ option.

- In the Power Options, click on the ‘Processor power management’ to expand this option.

- Under Processor power management, click to expand ‘Maximum processor state’ option.

- By default the values for ‘On battery’ and ‘Plugged in’ will be 100%. Change both these values to ‘99%’ by using the up/down arrows. Finalize, these settings by clicking ‘Apply’, then ‘OK’ buttons.

By changing these values to 99% you have made sure that your processor will never run on or more than 100%, thus, avoiding chances of overheating.
If this solution didn’t work for you, then try the next solution.
3) Update Graphics Card Drivers
If your graphics card is an old one or it’s been a long time since you last updated your graphics card driver, then you must update these drivers with its latest version. Doing this will help in creating a better coordination between your graphics card and other computer hardware components which may results in reducing game stuttering.
You can easily perform graphics card driver update if you follow the steps given below in their correct order:
- Right click your Windows Taskbar and select ‘Task Manager’ from the options.

- Click on ‘More details’ to expand the Task Manager options.

- Click on the ‘Performance’ tab and scroll to the GPU. Below GPU you will find the name of your graphic card processor. In this example, it’s ‘NVIDIA Quadro K600’. Note this down for the next step.

- Search Google for ‘graphic card name’ + ‘driver download’. In our case, we searched ‘NVIDIA Quadro K600 driver download’. From the search results, click on the official website link of your GPU.

- On the official webpage of your GPU, you will find the ‘Drivers & Downloads’ link. Click on it to download the driver of your graphics card.

- Right click the downloaded driver file, choose ‘Run as administrator’ to start the driver installation. Follow the prompts to complete the driver installation, then restart your computer.
If updating the graphics card driver doesn’t solve the game stuttering issue on your computer, then move to the next solution.
4) Turn on the Enhanced Sync or V-Sync
The stuttering in games may occur when there is a difference between the frame rates of the GPU and the frame rates of the monitor. However, you can easily fix this problem by using V-Sync settings in NVIDIA cards and Enhanced Sync settings on AMD graphics cards. These settings synchronize the frame rates of GPU and VDU, thus reducing and sometimes eliminating the chances of game stuttering.
Follow the steps given below to enable V-Sync in NVIDIA computer:
- Right click on the desktop and choose ‘NVIDIA Control Panel’ from the options.

- In the NVIDIA Control Panel, click on ‘Manage 3D settings’, under 3D Settings.

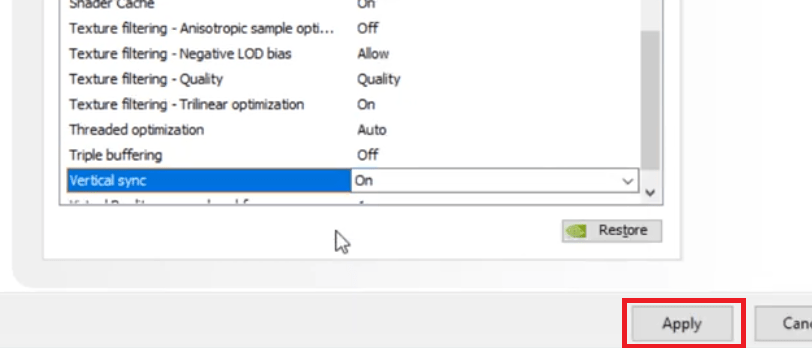
- In Global Settings tab, locate ‘Vertical sync’ under Settings.

- Click the ‘Down’ arrow in front of Vertical sync and choose ‘On’ from the list of options.

- Click ‘Apply’ to finalize the settings.

- Restart your computer for the settings to come into effect.
Follow the steps given below to enable Enhanced Sync in AMD computer:
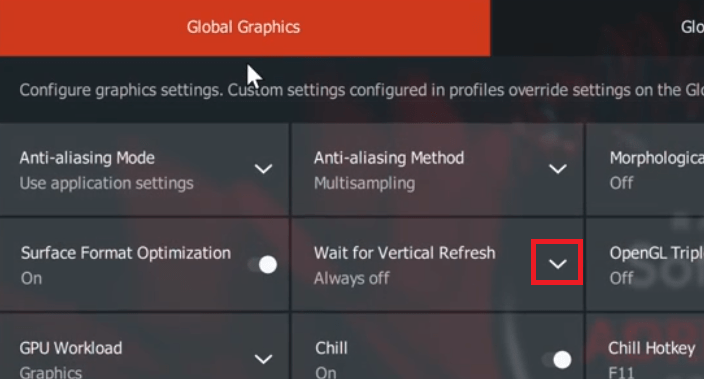
- Open AMD Radeon Settings app and select ‘Global Settings’.

- Locate ‘Wait for Vertical Refresh’ option and click on the ‘Down’ arrow in the front.

- From the drop-down list choose the ‘Enhanced Sync’ option.

- After making the selection, close the AMD Radeon Settings app and reboot your computer.
If this setting works for your computer, then you should start experiencing seamless and uninterrupted gameplay and the stuttering would end. Otherwise, move to the next solution.
5) Disable the Dynamic Tick
The Dynamic Tick feature in Windows stops the system timer to conserve power when your computer is not engaged in any activity. This feature is highly useful for battery systems, but on desktops this can result in strange issues when you are playing games or watching media. Therefore, disabling Dynamic Tick can help in reducing computer stuttering, especially if you are using a desktop computer.
Follow the steps given below to turn off Dynamic Tick on your computer:
- Type ‘cmd’ in the search box, then find and right click ‘Command Prompt’ in the search results and choose ‘Run as administrator’ option.

- In the Command Prompt, type ‘bcdedit /set disabledynamictick yes’ command and press ‘Enter’.

- Next, type ‘bcdedit /set useplatformclock true’ command and press ‘Enter’.

- Finally, type ‘bcdedit /set tscsyncpolicy Enhanced’ command and press ‘Enter’.

- Close the Command Prompt window and reboot your computer for the new settings to take effect.
After restarting your computer check if the game stuttering has stopped or not. If the stuttering still exists, then try the next solution.
6) Disable Diagnostic Policy Service
Stuttering in your game is sometimes caused by the Diagnostic Policy Service. Therefore, many gamers disable this Policy Service even when their computer is not stuttering while gaming. It is believed that this application collects information about energy consumption while you are playing games. Although this application runs in the background, but it can cause stuttering as it consumes the resources of your computer. Therefore, it’s advised to disable Diagnostic Policy Service.
Follow the steps given below to disable Diagnostic Policy Service on your computer:
- Press ‘Win + r’ keys simultaneously to open run dialog box. In the box, type ‘services.msc’ and click on the ‘OK’ button.

- In the list of Services, locate the ‘Diagnostic Policy Service’.

- Right click Diagnostic Policy Service and select ‘Properties’ option.

- In front of Startup type, click on the ‘Down’ arrow and select ‘Disabled’ from the list of options.

- Click ‘Apply’ and ‘OK’ button to finalize the settings.

- Reboot your computer.
Now check whether these changes have reduced game stuttering on your computer. If this solution didn’t work for you, then try the next one.
7) Reduce Graphical Settings
Reducing the graphical settings will surely reduce the stuttering on your computer. However, this reduction in stuttering comes at a price of compromised gaming interface. When you reduce display settings the visual quality of gaming reduces, but its speed increases. It’s a choice you will have to make, but if no other solution is working, then this one at least lets you experience non-lag and uninterrupted gaming.
Follow the steps given below to adjust graphical settings on your computer:
- Right click on the desktop and choose ‘Display settings’ from the options.

- In Display, you can change the ‘Resolution’ to your liking.

- Scroll down in the Display page and you will find ‘Advanced display settings’ and ‘Graphics settings’ links. You can use them to make some advanced changes, which suits your requirements.

These changes will surely remove game stuttering from your computer. However, if you think that reducing graphical settings is not the best way forward, then you can try the next solution as it might help you avoid this solution.
8) Close Other Apps While Playing Games
Sometimes the stuttering in games happen due to clogged or insufficient RAM. The easiest solution for this problem is to close all the other applications running on your computer while you are playing games. This way your computer RAM is fully dedicated for gaming and you get it’s the maximum performance.
Follow the steps given below to close all the apps before loading your game:
- Right click the Taskbar and choose ‘Task Manager’.

- In the Task Manager, under ‘Processes’ tab you will find the list of processes currently running on your computer. Find the apps which are no longer useful, then right click the app name and choose ‘End task’ to close that app.

- Perform this step for all the apps and games you no longer need to run.
Doing this will free-up a lot of space on your computer memory and now your game will run more smoothly.
Now you know several solutions for how to fix computer stuttering problem. There are many possible solutions and sometimes you need to apply multiple solutions to eliminate game stuttering. However, you must know that none of the solutions will work convincingly if your computer doesn’t satisfy the minimum system requirements of the game you want to run.


